DRAM, which stands for Dynamic Random-Access Memory, is a fundamental component in modern computing systems.
Its volatile memory allows your computer to store and access data quickly and efficiently.
Unlike other storage mediums like hard drives or SSDs, DRAM is designed for rapid data retrieval, making it important for various computing tasks.
DRAM plays a pivotal role in the overall performance of your computer. When you open an application, load a web page, or run any software, data is temporarily stored in DRAM for quick access by the CPU.
In this post, I will explain the specific aspect of DRAM that often raises concern among computer enthusiasts and builders – the DRAM light on the motherboard, including variations such as the white light on the motherboard.
Many modern motherboards have diagnostic LEDs, including one dedicated to DRAM.
I am here to simplify this tiny LED and guide you through troubleshooting steps so you can get your system back up and running smoothly.
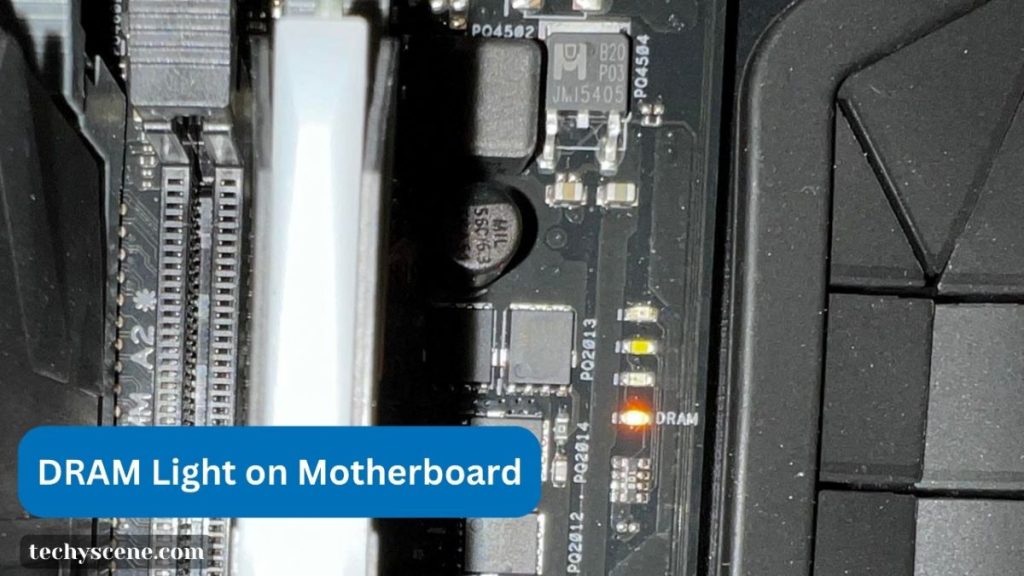
What Is The DRAM Light on Motherboard?
The DRAM light on a motherboard is a valuable feature on many advanced and high-end motherboards. This feature comprises a small LED indicator strategically placed on the motherboard itself.
Its primary purpose is to serve as a diagnostic tool that offers an understanding of the status of your computer’s memory modules, commonly known as RAM (Random-Access Memory).
This LED indicator isn’t just for aesthetics; it is vital in helping users identify potential issues related to their system’s RAM.
When the DRAM light is on, it signifies that there might be problems or irregularities with the installed RAM modules or their compatibility with the motherboard.
The DRAM light is like a friendly signal from your motherboard, indicating that it’s time to roll up your sleeves and troubleshoot potential memory-related issues to ensure your computer functions at its best.
It’s an essential tool for novice and experienced PC builders and enthusiasts, as it can quickly point you in the right direction when encountering system stability or boot-up problems.
Why Does The DRAM Light On Motherboard Turns On?
1. Incorrect BIOS Configurations
The DRAM light may illuminate due to incorrect BIOS settings. This can include mismatched memory frequency or voltage settings, which can cause instability and trigger the DRAM light.
2. Incompatible RAM Module
When you install RAM that isn’t compatible with your motherboard, the DRAM light can activate. Motherboards have specific memory slot requirements, so ensuring your RAM matches those specifications is crucial.
3.. Incorrect RAM Installation
If your RAM modules aren’t correctly seated in their slots or are in the wrong slots as per your motherboard’s instructions, the DRAM light might turn on, indicating a potential issue with memory configuration.
4. CPU Overheating
In some cases, the DRAM light can be indirectly related to CPU overheating. When the CPU temperature rises too high, it can affect system stability, leading to memory-related problems and the DRAM light coming on.
5. Insufficient Power Supply
A power supply unit (PSU) that can’t provide enough power to all components, including the RAM, can cause instability and trigger the DRAM light. It’s essential to ensure your PSU meets your system’s power requirements.
6. Outdated BIOS Version
An outdated motherboard BIOS can lead to compatibility issues with newer RAM modules, resulting in the DRAM light activation. Keeping your BIOS up to date can help prevent such problems.
7. Wrongly Seated Memory Modules
If your memory modules aren’t securely seated in their slots, it can disrupt the connection and cause the DRAM light to turn on. Double-checking your memory module installation is crucial.
8. Overclocking
Aggressive overclocking settings, especially for your RAM, can lead to instability and trigger the DRAM light. Finding a stable overclocking configuration is essential if you choose to overclock.
9. Faulty Hardware
Any defective hardware component, such as a malfunctioning RAM stick or a damaged motherboard, can lead to the DRAM light activation. Isolating and replacing the faulty component is the solution.
10. Memory Configuration Issues
Sometimes, complex memory configurations, such as mixing different RAM speeds or sizes, can confuse the motherboard and result in the DRAM light turning on. Ensuring your memory configuration adheres to your motherboard’s guidelines can resolve this.
How To Fix The DRAM Light On Your Motherboard
1. Inspect Power Supply
Begin by checking your power supply unit (PSU). Ensure it’s providing enough power to all components, including the RAM. Sometimes, an inadequate power supply can lead to DRAM light issues.
2. Inspect Components
Carefully examine all hardware components, including RAM sticks, motherboard connections, and the CPU. Loose connections or damaged components can trigger the DRAM light, so reseat or replace as needed.
3. Clean Motherboard
Dust and debris can interfere with motherboard functionality. Gently clean your motherboard and RAM slots to ensure a good connection.
4. Replace CMOS Battery
An old or depleted CMOS battery can lead to BIOS settings issues, potentially causing DRAM light problems. Replacing the CMOS battery is a straightforward fix.
5. Verify RAM Compatibility
Confirm that your RAM modules are compatible with your motherboard. Refer to your motherboard’s manual for supported RAM configurations.
6. Reset the DRAM
Some motherboards have a dedicated button or jumper to reset the DRAM configuration. Consult your motherboard’s manual and perform a DRAM reset if available.
7. Update BIOS
An outdated BIOS can cause compatibility issues with newer RAM modules. If needed, update your motherboard’s BIOS to the latest version from the manufacturer’s website.
8. Reseat the RAM
Carefully remove and reseat your RAM modules in their respective slots. Ensure they are securely and correctly installed.
9. Replace the Motherboard
If all else fails and the DRAM light issue persists, it might be a problem with the motherboard itself. In such cases, replacing the motherboard may be the only solution to resolve the issue.
Preventive Maintenance Tips For DRAM
1. Keep the Environment Clean
Dust and debris can accumulate on your RAM modules over time, potentially leading to overheating and reduced performance. Regularly clean your computer’s interior to ensure proper airflow and clean your RAM.
2. Firmware and BIOS Updates
Stay up-to-date with firmware and BIOS updates from your motherboard and RAM manufacturers. These updates can improve compatibility, stability, and performance.
3. Temperature Monitoring
Monitor the temperature of your RAM modules using software utilities or motherboard monitoring tools. Excessive heat can cause RAM errors, so ensure adequate cooling in your system.
4. RAM Testing
Periodically run RAM testing software like MemTest86 to check for memory errors. This helps identify potential issues before they affect system stability.
5. Static Electricity Protection
When handling RAM modules, use an anti-static wristband or work in an anti-static environment to prevent damage from static electricity.
6. Update Drivers and Firmware
Keep your motherboard chipset drivers and RAM firmware up-to-date. Outdated drivers can lead to compatibility issues and reduced performance.
7. Avoid Overclocking
Overclocking can boost RAM performance but also increase the risk of instability and hardware damage. If you’re not experienced with overclocking, it’s often best to stick with default settings.
8. Regular System Checks
Conduct routine system checks for hardware and software issues. Address any detected problems promptly to prevent them from affecting your RAM’s performance.
9. Proper Hardware Installation
Ensure RAM modules are correctly seated in their slots and that they are compatible with your motherboard. Follow manufacturer guidelines to avoid compatibility issues.
10. Stress Testing
Occasionally, stress test your RAM using software like Prime95 or AIDA64. This helps identify any weaknesses or instability under heavy workloads.
Conclusion
In the final part of our journey into the world of computers, we’ve learned some valuable things. First, we understood how important the DRAM memory is for our computers.
Then, we demystified the mysterious DRAM light on motherboards. This knowledge gives you, the computer lover, the power to understand and fix issues.
Now, let’s talk about taking care of your computer. Think of it like taking care of a car. Keep your computer’s insides clean from dust.
Update its software regularly to keep it running smoothly. Ensure it doesn’t get too hot like you wouldn’t want your car engine to overheat.
Sometimes, test your computer’s memory to ensure it works well. Be careful when touching computer parts to avoid static electricity. And only push your computer too hard by overclocking it if you really know what you’re doing.
In the end, understanding your computer’s memory and taking good care of it is like being the captain of a ship in the digital world.
You’re in control, and with these skills, your computer will be your trusty companion on all your digital adventures. So, keep learning, keep caring, and let your computer shine!